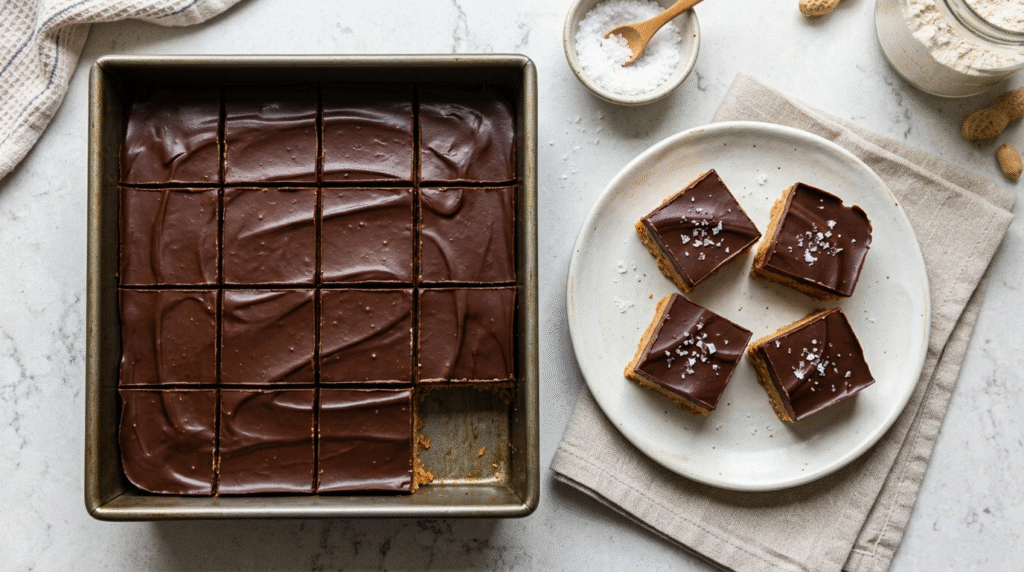
Imagine a dessert that delivers on all fronts: rich, creamy, chocolatey, peanut buttery, and requires absolutely no baking. Sound like a dream? It’s a delicious reality with these No-Bake Vegan Chocolate Peanut Butter Bars! This recipe is a game-changer for anyone who loves classic flavor combinations but wants a fuss-free approach to dessert. Whether you’re a seasoned vegan baker or just looking for an easy, crowd-pleasing treat, these bars are designed to impress with minimal effort.
The beauty of these bars lies in their simplicity and the incredible texture contrast. You start with a dense, sweet, and salty peanut butter base that melts in your mouth, then top it with a perfectly tempered, snappy layer of dark chocolate. Each bite offers a harmonious blend of nutty, sweet, and slightly bitter notes, creating a truly satisfying experience. They’re perfect for satisfying that afternoon sweet tooth, bringing to a potluck, or simply having on hand for a quick, indulgent snack. Forget complicated techniques or long ingredient lists; these bars prove that some of the best desserts are the easiest to make. Get ready to fall in love with your new favorite no-bake treat!
Recipe Info
- Prep Time: 20 minutes
- Chill Time: 1 hour 30 minutes
- Total Time: 1 hour 50 minutes
- Yield: 16 bars
Ingredients
For the Peanut Butter Base:
- 1 cup (250g) creamy peanut butter (natural, unsweetened)
- 1/2 cup (113g) vegan butter, softened
- 2 cups (240g) powdered sugar (confectioners’ sugar), sifted
- 1 teaspoon vanilla extract
- 1/4 teaspoon salt
For the Chocolate Topping:
- 1 1/2 cups (255g) vegan chocolate chips or chopped vegan dark chocolate
- 2 tablespoons coconut oil
Step-by-Step Instructions
- Prepare Your Pan: Line an 8×8-inch (20×20 cm) baking pan with parchment paper, leaving an overhang on two sides to easily lift the bars out later. Set aside.
- Cream Vegan Butter and Peanut Butter: In a large mixing bowl, combine the softened vegan butter and creamy peanut butter. Using an electric mixer (or a sturdy spoon), beat on medium speed until smooth and well combined, about 1-2 minutes. The mixture should be light and fluffy.
- Add Dry Ingredients: Gradually add the sifted powdered sugar and salt to the peanut butter mixture. Mix on low speed until just combined, then increase to medium and beat until the mixture is smooth and thick. Stir in the vanilla extract. The base should be firm enough to handle but still pliable.
- Press into Pan: Transfer the peanut butter mixture to the prepared baking pan. Using the back of a spoon or your hands, press the mixture down firmly and evenly into the bottom of the pan. Make sure it’s packed tightly into all corners.
- Chill the Base: Place the pan in the refrigerator for at least 30 minutes to allow the base to firm up while you prepare the chocolate topping.
- Melt Chocolate Topping: In a microwave-safe bowl, combine the vegan chocolate chips and coconut oil. Microwave in 30-second intervals, stirring well after each, until the chocolate is completely melted and smooth. Alternatively, melt over a double boiler.
- Pour Chocolate Layer: Remove the chilled peanut butter base from the refrigerator. Pour the melted chocolate mixture evenly over the peanut butter layer, spreading it gently with a spatula to cover the entire surface.
- Chill to Set: Return the pan to the refrigerator and chill for at least 1 hour, or until the chocolate topping is completely set and firm to the touch.
- Cut and Serve: Once fully chilled, use the parchment paper overhangs to lift the entire slab of bars out of the pan. Place on a cutting board. Using a sharp knife, cut into 16 squares or bars. For clean cuts, you can warm your knife under hot water and wipe it dry between cuts.
Pro Tips for Success
- Soften Vegan Butter Properly: Ensure your vegan butter is truly softened, not melted. This allows it to cream beautifully with the peanut butter, creating a smooth, airy base. If it’s too cold, it won’t incorporate well; if too warm, the base might be too soft.
- Sift Powdered Sugar: Don’t skip sifting the powdered sugar. This prevents lumps in your peanut butter base, ensuring a perfectly smooth and creamy texture.
- Pack the Base Firmly: When pressing the peanut butter mixture into the pan, use firm, even pressure. A well-packed base will hold its shape better and provide a satisfying density to the bars.
- Warm Your Knife for Clean Cuts: For professional-looking, clean-edged bars, dip your knife in hot water and wipe it dry before each cut. This helps the knife glide through the chocolate without cracking it.
Variations & Substitutions
- Nut Butter Alternatives: While peanut butter is classic, you can experiment with other creamy nut or seed butters like almond butter, cashew butter, or sunflower seed butter for a different flavor profile or to accommodate allergies. Ensure they are natural and unsweetened.
- Gluten-Free Option: This recipe is naturally gluten-free, but always double-check your ingredient labels (especially for chocolate chips) to ensure they are certified gluten-free if needed.
- Higher-Protein Boost: Stir in 1-2 tablespoons of vegan protein powder (vanilla or unflavored works best) into the peanut butter base for an extra protein kick. You might need to add a tiny splash of plant milk if the mixture becomes too dry.
- Flavor Boosters: Add a pinch of cinnamon or a tiny amount of instant espresso powder to the chocolate topping for an extra layer of flavor complexity. A sprinkle of flaky sea salt on top of the wet chocolate layer before chilling also enhances the flavors beautifully.
Serving Suggestions
These No-Bake Vegan Chocolate Peanut Butter Bars are incredibly versatile. They are perfect as a standalone dessert after any meal, especially when you’re craving something rich and satisfying without the heaviness of a baked good. They make an excellent addition to a dessert platter for parties, potlucks, or holiday gatherings, as they’re easy to transport and universally loved. Enjoy them with a cup of coffee or a glass of cold plant-based milk for a delightful afternoon treat. They’re also fantastic for meal prep, providing a quick and indulgent snack throughout the week.
Storage & Reheating
- Refrigerator: Store leftover bars in an airtight container in the refrigerator for up to 1 week. The cold helps maintain their firm texture and prevents the chocolate from melting.
- Freezer: For longer storage, place the cut bars in a single layer on a baking sheet and freeze until solid. Once frozen, transfer them to a freezer-safe airtight container or bag, separating layers with parchment paper to prevent sticking. They will keep in the freezer for up to 2-3 months.
- Reheating: No reheating needed! These bars are best enjoyed chilled straight from the refrigerator or freezer (allow frozen bars to thaw for 10-15 minutes at room temperature for optimal texture).
Frequently Asked Questions
Can I use crunchy peanut butter?
While creamy peanut butter is recommended for the smoothest base, you can use crunchy peanut butter if you prefer a textured base. Just be aware that the texture will be less uniform.
Why is my chocolate topping not setting properly?
Ensure you are using good quality vegan chocolate chips or baking chocolate. The addition of coconut oil helps with a smooth pour and a good set, but if your kitchen is very warm, it might take longer to firm up. Make sure the bars are chilled for the full recommended time, or even longer if needed, until the chocolate is completely solid.
Can I make these bars ahead of time?
Absolutely! These No-Bake Vegan Chocolate Peanut Butter Bars are an excellent make-ahead dessert. You can prepare them up to 3-4 days in advance and store them in an airtight container in the refrigerator. They actually taste even better after a day or two, as the flavors meld together.
Final Thoughts
These No-Bake Vegan Chocolate Peanut Butter Bars are more than just a dessert; they’re a testament to how simple ingredients can create something truly extraordinary. With their rich, creamy layers and irresistible flavor, they’re guaranteed to become a staple in your recipe collection. So go ahead, whip up a batch, and treat yourself to a moment of pure, unadulterated bliss. You deserve it!