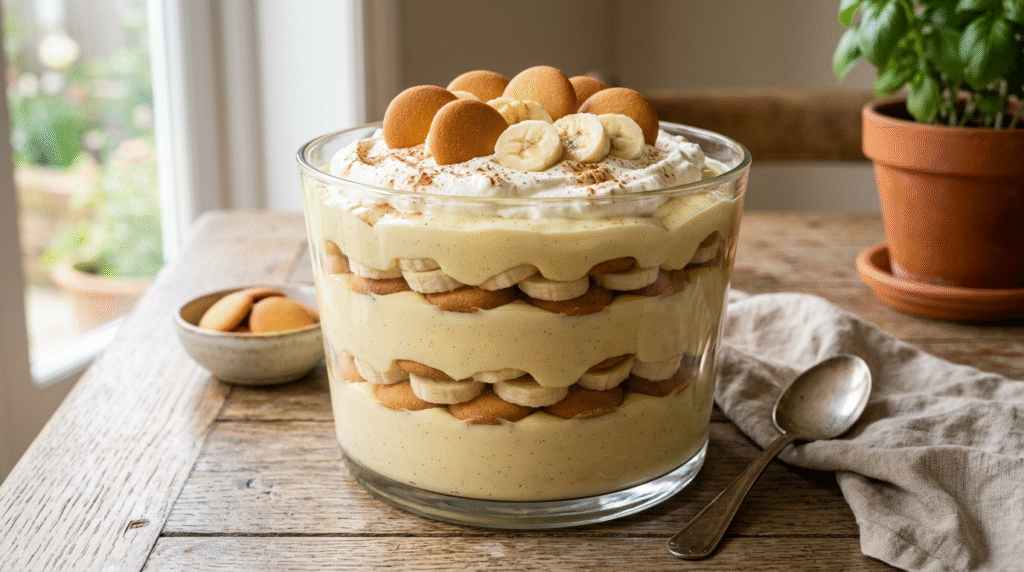
There are some desserts that instantly transport you back to cherished memories, and classic banana pudding is undoubtedly one of them. This beloved no-bake treat is a staple in many homes, celebrated for its comforting flavors and incredibly simple preparation. Forget complicated baking or lengthy ingredient lists; this recipe delivers pure, unadulterated joy with minimal effort.
What makes this banana pudding so special? It’s the harmonious blend of textures and tastes. Imagine velvety smooth vanilla pudding, perfectly ripe banana slices that offer a natural sweetness, and the satisfying crunch of vanilla wafers that soften just enough to become cake-like as they absorb the creamy goodness. Each spoonful is a delightful balance of sweet, creamy, and tender, making it an irresistible dessert for any gathering or a quiet evening at home.
This recipe solves the common dessert dilemma: how to create something impressive and delicious without spending hours in the kitchen. It’s a fantastic option for busy weeknights, potlucks, or when you need a crowd-pleasing dessert that requires no oven time. The result is a dessert that feels both nostalgic and fresh, satisfying your sweet tooth and leaving everyone asking for the recipe. Get ready to create a dessert that’s not just food, but a truly comforting experience.
Recipe Info
- Prep Time: 20 minutes
- Chill Time: 4 hours (minimum)
- Total Time: 4 hours 20 minutes
- Yield: 8-10 servings
Ingredients
For the Pudding:
- 2 (3.4 ounce) packages instant vanilla pudding mix
- 4 cups cold milk (whole milk recommended for creaminess)
- 1 (14 ounce) can sweetened condensed milk
- 1 teaspoon vanilla extract
- 1 (8 ounce) container frozen whipped topping, thawed (like Cool Whip)
For Layering:
- 5-6 ripe but firm bananas, sliced into 1/4-inch rounds
- 1 (12 ounce) box vanilla wafers
Step-by-Step Instructions
- Prepare the Pudding Base: In a large mixing bowl, combine the instant vanilla pudding mix and 4 cups of cold milk. Whisk vigorously for 2 minutes until the mixture begins to thicken. It should be smooth and lump-free.
- Add Sweetness and Flavor: Pour in the entire can of sweetened condensed milk and add the vanilla extract. Continue to whisk for another minute until everything is well combined and the mixture is uniformly creamy.
- Fold in Whipped Topping: Gently fold in the thawed whipped topping using a spatula. Be careful not to overmix; fold until just combined and no streaks of whipped topping remain. This creates a light and airy texture for your pudding.
- Assemble the First Layer: In a 9×13 inch baking dish or a large trifle bowl, arrange a single layer of vanilla wafers on the bottom. You may need to break some wafers to fit them snugly and cover the entire base.
- Add Bananas: Place a layer of sliced bananas over the vanilla wafers. Ensure the banana slices are evenly distributed.
- Spoon in Pudding: Carefully spoon about one-third of the prepared pudding mixture over the bananas and wafers, spreading it gently to cover completely.
- Repeat Layers: Continue layering with vanilla wafers, then bananas, and then pudding. Repeat this process until you have used all the ingredients, ending with a final layer of pudding on top.
- Chill Thoroughly: Cover the dish tightly with plastic wrap and refrigerate for at least 4 hours, or preferably overnight. Chilling allows the pudding to set completely and the vanilla wafers to soften, creating that signature cake-like texture.
- Serve: Once chilled, remove from the refrigerator and serve cold. Garnish with a few extra vanilla wafers or banana slices if desired.
Pro Tips for Success
- Choose the Right Bananas: Opt for ripe but firm bananas. They should have a few brown spots, indicating sweetness, but still be firm enough to hold their shape when sliced. Overly ripe bananas can become mushy, while underripe ones lack flavor.
- Don’t Rush the Chill Time: The chilling period is crucial. It allows the pudding to fully set and, more importantly, gives the vanilla wafers time to absorb moisture from the pudding, transforming them into a soft, cake-like layer. A minimum of 4 hours is essential, but overnight is ideal.
- Gentle Folding for Airiness: When incorporating the whipped topping, use a gentle folding motion with a spatula. This preserves the airiness of the whipped topping, resulting in a lighter, fluffier pudding texture. Overmixing can deflate it.
- Prevent Banana Browning: To minimize banana browning, you can lightly toss the sliced bananas in a tablespoon of lemon juice or pineapple juice before layering. This isn’t strictly necessary if serving within 24 hours, but it helps for longer storage or presentation.
Variations & Substitutions
- Gluten-Free Option: Simply swap out traditional vanilla wafers for gluten-free vanilla or shortbread cookies. Ensure the pudding mix is also gluten-free (most instant pudding mixes are, but always check the label).
- Dairy-Free/Vegan Option: This classic recipe relies heavily on dairy. For a dairy-free version, use dairy-free instant vanilla pudding mix (often made with cornstarch), plant-based milk (almond or soy work well), dairy-free sweetened condensed milk, and a non-dairy whipped topping. Use vegan vanilla wafers.
- Ingredient Swaps: Instead of vanilla wafers, you can use shortbread cookies, graham crackers, or even Nilla Wafers for a slightly different flavor profile. For a richer pudding, you can make a homemade custard instead of instant pudding mix, but this will increase the cook time.
- Lighter Option: Use skim milk and a light or sugar-free instant pudding mix. You can also opt for a low-fat whipped topping.
Serving Suggestions
Classic banana pudding is a dessert that shines on its own, but it’s also a fantastic addition to a spread of comfort foods. Serve it chilled, perhaps with a dollop of extra whipped cream or a sprinkle of cinnamon for an elegant touch. It’s perfect for backyard barbecues, family gatherings, potlucks, or as a comforting dessert after a hearty meal. Pair it with iced tea or a glass of cold milk for the ultimate nostalgic experience.
Storage & Reheating
Store any leftover banana pudding tightly covered with plastic wrap in the refrigerator. It will stay fresh and delicious for up to 3-4 days. The wafers will continue to soften over time, which many find even more enjoyable. Freezing is not recommended for this recipe, as the bananas can become mushy and discolored upon thawing, and the pudding texture may change.
Frequently Asked Questions
Q: Can I make this banana pudding ahead of time?
A: Absolutely! In fact, making it ahead is highly recommended. Prepare the pudding the day before you plan to serve it, allowing it to chill overnight. This gives the flavors time to meld and the wafers to soften perfectly.
Q: Why are my bananas turning brown in the pudding?
A: Bananas naturally oxidize and turn brown when exposed to air. While the pudding helps to slow this process, some browning is inevitable over time. To minimize it, ensure bananas are fully covered by the pudding layers. You can also lightly toss banana slices in a small amount of lemon or pineapple juice before layering, though this can slightly alter the flavor.
Q: Can I use homemade whipped cream instead of frozen whipped topping?
A: Yes, you can! For a richer, fresher taste, substitute the frozen whipped topping with 2 cups of freshly whipped heavy cream (sweetened with 2-3 tablespoons of powdered sugar and 1/2 teaspoon vanilla extract). Fold it in gently as instructed.
Final Thoughts
This Classic No-Bake Banana Pudding with Vanilla Wafers is more than just a dessert; it’s a taste of pure comfort and simplicity. With its creamy layers, sweet bananas, and tender wafers, it promises to be a delightful end to any meal or a welcome treat on a warm afternoon. Easy to assemble and impossible to resist, it’s a recipe that will surely become a cherished favorite in your kitchen. Don’t wait – whip up a batch today and savor every delicious spoonful!